Interfacing the real-world with a Velleman K8055N / P8055N
Introduction
see also: controlling outputs, using the counter and inputs
The Velleman K8055N is a USB I/O hobby board: it comes with 5 digital inputs (two of which are associated with counters), 2 analogue inputs, 8 digital 'open-collector' outputs, 2 analogue DAC output (and 2 associated PWM's clocked at 23.43kHz). Maybe not sufficient for demanding I/O applications, but certainly sufficient for the interfacing of many home-brew hobby applications, via some basic programming and a USB interface.

Rather than messing around with Windows graphical programming environments, if you simply want control of the board, I highly recommend QB64. In QB64, you can make calls to procedures stored in external dll's in a native, in a fairly easy to understand way. This is most convenient since the procedural calls to control the K8055N are all neatly stored in a single dll, which as of the time of writing, is version 5.0.0.0 'k8055d.dll'. You can download the file here, or direct from Velleman - naturally, the file also comes bundled with the K8055N product.
To load the dll in QB64, drop the DLL file in either the windows system folder, or the QB64 folder, or the folder containing the compiled project. We use the following declarations, and then we can access the procedures as functions as one would native QB functions. I put these declarations at the top of the QB bas file, but I guess it could go at the end too. You can copy and paste the declarations, and the example source code into QB64, compile it and you're in like Flynn - you have a standalone executable that can control the board! For convenience, you can download the BAS file containing the below code here.
DECLARE DYNAMIC LIBRARY "K8055D"
	FUNCTION Version&
	FUNCTION SearchDevices&
	FUNCTION SetCurrentDevice& (BYVAL CardAddress AS LONG)
	FUNCTION OpenDevice& (BYVAL CardAddress AS LONG)
	FUNCTION CloseDevice&
	FUNCTION ReadAnalogChannel& (BYVAL Channel AS LONG)
	FUNCTION ReadAllAnalog& (Data1 AS LONG, Data2 AS LONG)
	FUNCTION OutputAnalogChannel& (BYVAL Channel AS LONG, BYVAL Data1 AS LONG)
	FUNCTION OutputAllAnalog& (BYVAL Data1 AS LONG, BYVAL Data2 AS LONG)
	FUNCTION ClearAnalogChannel& (BYVAL Channel AS LONG)
	FUNCTION SetAllAnalog&
	FUNCTION ClearAllAnalog&
	FUNCTION SetAnalogChannel& (BYVAL Channel AS LONG)
	FUNCTION WriteAllDigital& (BYVAL Data1 AS LONG)
	FUNCTION ClearDigitalChannel& (BYVAL Channel AS LONG)
	FUNCTION ClearAllDigital&
	FUNCTION SetDigitalChannel& (BYVAL Channel AS LONG)
	FUNCTION SetAllDigital&
	FUNCTION ReadDigitalChannel& (BYVAL Channel AS LONG)
	FUNCTION ReadAllDigital&
	FUNCTION ReadCounter& (BYVAL CounterNr AS LONG)
	FUNCTION ResetCounter& (BYVAL CounterNr AS LONG)
	FUNCTION SetCounterDebounceTime& (BYVAL CounterNr AS LONG, BYVAL DebounceTime AS LONG)
END DECLARE
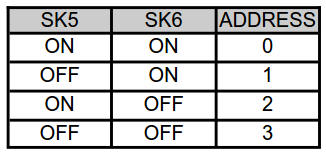
To access the board, we first have to open the device, as addressed via the two jumpers on the board (SK5 and SK6). We do this using the function OpenDevice(ADDRESS)

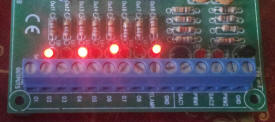
Subsequently, we clear all the digital outputs (ClearAllDigital), and then write an 8-bit number (0-255) using the function, WriteAllDigital(byte). For example,
PRINT "Attempting to open device 0. Response="; OpenDevice(0)
PRINT "Clearing all digital outputs. Response="; ClearAllDigital
1:
CLS
PRINT "enter data to output, 0-255 or -1 to exit"
DIM nothing, wOut
INPUT wOut
IF wOut < 0 THEN GOTO 2
PRINT "setting digital outputs to ", wOut
PRINT WriteAllDigital(wOut)
GOTO 1:
2:
PRINT "closing device, response="; CloseDevice
The compiled source code presents you with a dos-box, ready for you to enter a number to write to the card.


What a bobby dazzler !